


Sunshine's Homemade Coconut Cream Pie. This coconut cream pie recipe features a thick and creamy coconut filling, crispy homemade pie crust, mounds of sweet whipped cream, and toasted coconut. Blind bake the pie crust first, then chill the pie filling until thick and lush. You either love it or hate it.
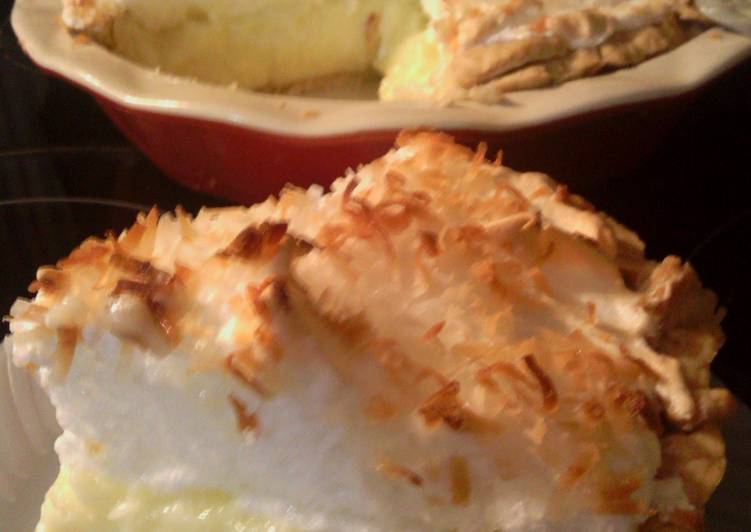 This Homemade Coconut Cream Pie is the best I've tried and I consider myself a pie connoisseur. Rich, velvety coconut custard in a deep dish flaky pie crust and topped with a huge mountain of fresh whipped cream. And like, not to brag or anything, but I consider myself somewhat of a pie connoisseur. You can cook Sunshine's Homemade Coconut Cream Pie using 18 ingredients and 6 steps. Here is how you achieve that.
Ingredients of Sunshine's Homemade Coconut Cream Pie
- Prepare of basic pie crust.
- You need 1 1/2 cup of all purpose flour.
- You need 1/4 tsp of salt.
- Prepare 1/2 cup of Crisco shortening.
- You need 3 of to 4 tablespoon cold water.
- You need of coconut cream.
- You need 3/4 cup of sugar.
- You need 1/8 tsp of salt.
- You need 1/4 cup of cornstarch.
- Prepare 2 3/4 cup of milk.
- Prepare 3 large of eggs yolks.
- Prepare 1 cup of coconut flakes divided.
- You need 1 1/2 tbsp of butter.
- You need 1 tsp of plus 1/4 teaspoon vanilla extract.
- You need of meringue.
- Prepare 3 of egg whites room temp,.
- Prepare 1/4 tsp of cream of tartar.
- You need 1/4 cup of plus 1 tablespoon sugar.
Coconut and lemon are probably my favorite match. This pie has an unexpected shortbread-like crust made with only coconut oil! The result is flaky, crumbly, and delicious. The creamy curd center gets an upgrade using coconut cream!
Sunshine's Homemade Coconut Cream Pie instructions
- preheat oven to 425°F,useing a 9" pie dish..
- combine flour and salt cut in shortening with the pastry blade or your fingers till coarse meal. with a fork stir in enough cold water 1 tablespoon at a time, to moisten dry ingredients, shape into a ball..
- roll out dough into 1/8 inch thickness on a lightly floured surface, place in pie plate, fold edges under and flute, with a fork, poke holes on bottom and sides of shell,now bake the shell for 12 to 15 minutes.....when shell is done take out of oven set to side, make coconut cream now..
- CREAM COCONUT in a heavy saucepan, combine sugar,cornstarch, and salt. and mix the milk and egg yolks together in a small bowl, pour milk mixture into dry ingredients, stir till smooth ,cooking over medium heat, stirring constantly, until mixture thickens and boils,cook another 30 seconds, stirring rapidly. take off heat, add the butter, coconut flakes and vanilla extract all at once. stir in good,pour in ready pie shell.
- cover filling with plastic wrap or wax paper, this prevents a film growing on top of custard,set pie a side..
- (Making The Meringue) beat room temp, egg whites and cream tartar, on hight speed useing electric mixer or standing mixer, for 1 minute, gradually add the sugar one tablespoon at a time, beat 3 to 4 minutes with electric mixer, for standmixer 2 minutes.till stiff peak. spoon out meringue placing on custard filling to the edge of shell to seal, (don't forget to remove the plastic from custard.lol), now after u got all your meringue in place. sprinkle the rest of your coconut on top, placing pie back in oven, should be on 350°F, this is to golden brown the top for 10 minutes, (never use broiler to brown ur coconuts ) when 10 minutes is up ,take out of oven ,let completely cool, about 4 hours or more, then cut and serve .....enjoy this pie!!!!!!!!!!.
If you serve immediately, the pie will be a bit messier than if you were to chill it for a few hours. How to store coconut cream pie? You can cool a coconut cream pie at room temperature for about an hour then place the pie in the refrigerator. Cover loosely with aluminum foil or plastic wrap. Can coconut cream pie be frozen?
0 comments:
Post a Comment